Neighbours talking over the garden gate has long been a tradition. They share gardening tips, complain about the weather and pests yet are ever eager to discuss their gardens. That is what I had in mind when creating this blog. So stop by my garden gate to find out the latest happenings in my garden.

Happy Gardening!

Garden Gnome
"All my life through, the new sights of Nature made me rejoice like a child." ~ Madame Marie Curie"
Showing posts with label DIY. Show all posts

Saturday, June 30, 2012

My Ornamental Garden Plans

When we first viewd our new home, the garden that accent the front and sides of the house as well as the perimeter of the back yard appeared lush.  When we moved in, we quickly realized thistles were quite problematic in most of the garden beds.  The plantings were ecclectic, and too much.  Once again we resigned ourselves to ripping out the gardens and starting fresh with the look we wanted.


small garden bed between sidewalk and garage on west side
There is a small garden bed between the sidewalk and the west side of the garage.  There was a large Rose of Sharon that was quite lovely but blocked being able to use the sidewalk without battling branches.  It was simply too large for that location.  We cut it down shortly after moving in.  In the spring, this little garden started coming to life but it certainly wasn't what we wanted.  It was too cluttered.  Adding to the cluttered feel, the previous owners had placed a one row brick retaining wall partially onto the sidewalk pavers around the entire little garden.  A matching but higher wall (not shown) on the other side of the garden runs the width of the house, wrapping around to contain another tree that is too large for its location and then abruptly ends with jagged rock taking over to define the side garden bed.  We are ripping it all out!

small garden bed between sidewalk and garage replanted
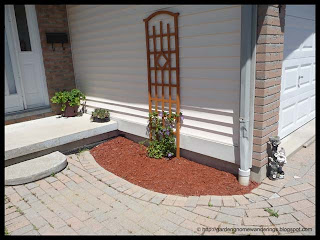
Once the garden bed was completely cleaned out, we installed a red cedar trellis.  I have two more of them to be installed either on the west wall of the house or the east wall of the garage.  I planted a clematis that will give a nice impact of colour without impeding sidewalk traffic or damaging the siding.  I finished off the bed with red cedar mulch.  I like the clean, uncluttered look.  I may add a decorative element but want to see how the garden looks once our steps are refinished and the front garden bed is redone. 

We are being hampered by weather between heat waves and storms so not much is getting done in the gardens.  Well, we are getting things done but it's slow going.  I keep puttering away at the ornamental garden beds.  The front garden bed is going to be a lot of work with the removal of a tree, two shrubs and moving all of that brick for the retainer wall.

Happy Gardening! 

Garden Gnome

©2006-2012


Tuesday, February 15, 2011

Plant Cage

The last couple of days have been on the mild side very much welcomed from the previous week of cold temperatures and blizzard conditions.  My husband was at Home Hardware to pick up more salt for the driveway.  He brought home the spring edition of Home at Home, an idea magazine put out by Home Hardware.  There's always great ideas in the magazine as well as instructions on how to complete the projects. 

One of the projects is a plant cage meant to keep rabbits, groundhogs, deer and cats out of the garden or at least away from susceptible plants.  The box is constructed like my square foot beds but has supports and a top rail that rises about a foot making the overall height about 18 - inches tall.  Carpenter's cloth is stapled securely around the base, supports and rails.  Then a hinged top is added that consists of 2 x 2 with carpenter's cloth fastened underneath.  The end result when closed the plants are well protected from common garden pests. 

This is an excellent way to turn a raised bed into a protected bed.  As they did it a 4' x 4' bed could easily be protected from rabbits, squirrels and sometimes the nuisance birds.  I'm thinking a refined version would help prevent squash borer in my zucchini plants as well.  There are so many ways this design could be customized to deal with a few common garden pests.

Happy Gardening!

Garden Gnome


Sunday, December 26, 2010

Constructing a Garden Pond

All garden pools regardless of their size are constructed pretty much the same way.  You can use a rigid, pre-formed black pond liner or black pond liner however if you want to save a bit of money you can use a pre-formed kiddy pool.  Ideally the pond should be at least 3 feet deep at its deepest but if over wintering fish the pond should be deeper.  The pond excavation site should be leveled which is very important when using pre-formed liners.  Pond constructed with pond liner should be leveled then lined with old rug material or sand to cushion the bottom somewhat.  Once the liner is in place water is added, smoothing out the liner as the pond fills.  Filtration and water movement is added then the edge is naturalized with rocks and vegetation along with the pond planted.  Floater plants are added and finally the fish.  Our experience was it was better to add fish a good week or so after the water had time to age.  Here's a video outlining how to set up a garden pond.  Enjoy!


Happy Gardening!

Garden Gnome
©2006-2010