Neighbours talking over the garden gate has long been a tradition. They share gardening tips, complain about the weather and pests yet are ever eager to discuss their gardens. That is what I had in mind when creating this blog. So stop by my garden gate to find out the latest happenings in my garden.
Happy Gardening!
Garden Gnome
"All my life through, the new sights of Nature made me rejoice like a child." ~ Madame Marie Curie"
We had five raised beds and now have eight all planted in the square foot gardening method using companion planting. The beds are planted based on the ADLF. This means the cool weather crops are planted a month before the ADLF, some are planted on the ADLF and the frost sensitive plants are planted two weeks after the ADLF. For that reason garden planning is a must. This planning starts with the previous growing season. As the fruits, herbs and vegetables grow I make careful notes in my journal.
I think keeping a detailed journal is a very important part of gardening. It will help you troubleshoot and plan for the following growing season. It will help you determine which varieties do best in your hardiness zone. I record the weather conditions and how the plants are growing. Any problems such as pests or possible disease are recorded with as much detail as possible. More importantly I take pictures and include them in my journal. Quite often I will sit down in the evening, read over my notes and realize that there is a problem that needs attention. Without my notes and pictures it might easily have been overlooked. I can't stress the importance of a gardening journal enough.
Once the beds are prepared for the winter I review my garden journal and pictures then start planning for the new garden season. I make a list of what grew well then create a layout for each bed. Of the five original beds, one is dedicated to strawberries so needs no plan. The excitement grows when the first seed catalogue arrives. I like both OSC and Stokes for the ease of ordering online. Once the seeds have been ordered I start a more formal plan. I used to do this by drawing out each layout by hand but now I'm using Garden Manager Pro software. This software has the vegetable information and garden layout adapted from Square Foot Gardening by Mel Bartholmew and has greatly simplified the layout planning.
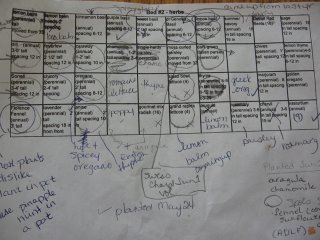
Using the recommended square foot gardening recommended densities for each plant along with companion planting recommendations, I came up with the layouts for the beds then printed them off. As you can see the working copy becomes rather cluttered. I use it for making quick changes and notes of when to plant. Like any plan some flexibility is needed. Each square has a number in brackets after the plant name. This indicates the planting density. For example in bed #2 that is home to the herbs, I decided to plant lettuce in a couple of squares. The number after the lettuce appears as (4) meaning four lettuce plants to that square. I also use colour coding for a quick visual for when to plant according to the ADLF. This is really just a simple scribble with a pencil crayon. I even use Xs or checkmarks to planting times or if the square was planted. While the working copy appears to be cluttered it holds a lot of valuable information.
 Working Copy
Sometimes a quick change is necessary if a volunteer plant is discovered. In bed #5 two volunteer sunflowers came up. Since that bed wasn't fully planned, I left them where they were and just incoporated them into the final bed layout. A volunteer pea plant surprised me in bed#3. Since it was in the bed where the beans and peas were going to be planted I simply left it there and noted the change on the working copy sheet. There are times when I realize I made a mistake in the planning process as in the fennel planned for bed #2. Fennel doesn't get along well with other plants so I decided to plant it in a container. I have also realized that lemon balm is a member of the mint family so is very invasive. It is everywhere so will have to be moved out of the herb bed. Mistakes are a good thing if you learn from them.
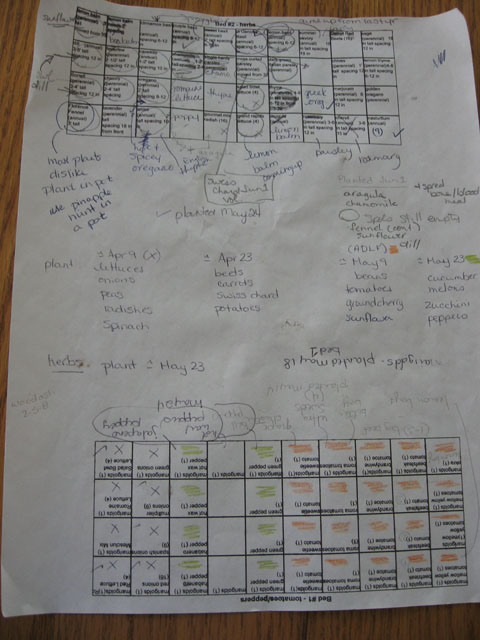
The herb bed is the easiest to plan as the perennials are already there so planning is only needed for the annual herbs. Again quick changes were necessary. I had a problem with the germination of some herbs in the greenhouse so found myself with nothing to plant in those spaces. Unfortunately the local nuseries didn't have potted herbs that I wanted. That left me with spaces to fill. When using the square foot gardening method there is nothing wrong with leaving a space empty or filling it with a non-edible companion plant.
 Herb Bed Plan
When using the square foot gardening method, the plan is only a guide. As the cold weather crops like lettuces, spinach, radishes and peas finish the squares are replanted with another crop keeping companion planting recommendations in mind. Some squares like the pole beans, tomatoes, perennial herbs, peppers and onions will remain constant without replanting throughout the entire growing season. These are the plants I use to plan the layouts. They are planned first and everything else worked around them. Even with very careful planning always expect surprises and be willing to be flexible. My peas thew me a curve ball this year. Other years they have been punny and almost non-productive. This year I tried a couple of different varieties. They are over five feet tall and we had to make emergency supports for them. I'm not complaining as they are loaded with pods but this was totally unexpected. You can bet I'll be growing these varieties next year!
Planning your garden can be a very rewarding part of gardening. A well thought out and planned garden is more likely to be successful. Start planning your next season's garden with this season.
Happy Gardening
Garden Gnome

Epsom Salt
This 100% natural mineral is a gardener's solution! Epsom Salt is maganesium sulfate and it can be used to get great results in the garden as well as a soak for aching muscles after a day in the garden.
General Use: Mix 1/2 c epsom salt per gallon of water for watering potted plants. Apply 1 tsp per foot of height for each plant once biweekly.
Tomatoes: Add 2-3 tbsp per hole before planting then twice a month, sprinkle 1 tbsp per foot of height per plant biweeklyy.
Roses & Flowers: Use 1/2 c in the soil at the base of the plant then uses a foliar spray of 1 tsp epsom salt to 1 gallon water or use 1 tsp per foot at base biweekly
Peppers & other fruits and vegetables: Miz 1 tbsp per gallon of water and water monthly or us one tsp per foot of height per plant biweekly.
Outdoor plants & shrubbery: Use 1-2 tbsp around base of plants every 2 - 4 weeks.
Gardener's Dream for Tired Muscles: Dissolve 2 c epsom salt in warm tub of water. Relax while pondering seed catalogues.
Happy Gardening
Garden Gnome
You never know what you are going to see in your garden. If you do a 15 minute walk about of your garden as I do twice daily, you might see just about anything from the critter that is eating your beans to a wide variety of critters just visiting your garden. Pictures tell more than words so if one of your plants is doing something odd take a picture for troubleshooting. If you find an undentified insect or plant and want to know whether it is friend or foe take a picture. Chances are very good someone else has encountered that problem or insect. However pictures are not just for troubleshooting. Get close-up of your plants. Add the pictures to your garden journal along with your comments. For that reason I make it a point to never go into my gardens without a camera!
Happy Gardening
Garden Gnome
There are so many ways to save on gardening but I thought it might be a good idea to highlight some of them. I think there are four main aspects: environment, cost, time, and effort. So I'll mention a few of the things I do to save in all aspects.
Environment:
As gardeners I firmly believe we are stewards of the land. That means we should do nothing to harm the land and we should encourage as natural of an ecosystem as possible. In essence we should leave the land better than we found it. Since we are planting things that don't normally grow wild we still need to encourage birds, butterflies, beneficial insects and etc. At the same time we need to control the harmful invaders if we want a crop so we need to find a balance. My rule of thumb with any type of pest control is to use the least harmful method possible. In some cases this is fencing when dealing with the larger animals but it is environmentally friendly. My second rule of thumb is organic as near as I can get. Our lot backs onto farmland so I can't be sure his sprays don't get on my garden but I can be sure that I haven't put any sprays on the garden. But there are other ways to save environmentally.
Establish a compost whether it be bin or pile. Compost is just good all the way around. It gives nutrients to your plants, retains moisture in your beds, and get rid of garden and kitchen waste making it the perfect recycled ingredient. For the past few years I've used a very simple pile method. My municipality had a special on compost bins for $25 so I decided to pick one up. I'll still run the pile because the garden has expanded enough to need more compost. Composting is a must!
Water! It amazes me how we take water for granted even for our gardens. Then it boggles my mind that someone will tell me their garden is organic even though they are using municipal water. Hello! That water is treated and in many areas still has both floride and chlorine in it when it comes out of your tap. I've designed water barrels to collect rain water of which I will be posting a step by step method of constructing them. So check back here for those instructions. Those with ponds will know that pond water makes great fertilizer while watering your gardens. If you have fish in your ponds do not use the water for edible plants. Your flowers and lawn will love it. I maintain a water feature or two in my garden.
Cost:
There are just so many ways to save on gardening. I think this might warrant a separate post. Get clippings or seeds from others which is why I'm trying to start a seed exchange on my yahoo group. Take clippings and save seeds from your own plants. I have heard others have had luck with bargain priced seeds. I can't comment on this. However check back here as I will make a post just on saving money.
Time & Effort:
Sometimes together and sometimes not but they always seem to fall together. You either have a lot of time and no effort or visa versa. I think one of the biggest bains of gardening is weeding. So here is my method. I do a complete walk through the garden morning and evening. It takes me about 10 minutes and as I go I pull any noticeable weeds. I might deadhead a plant or check for insects. The important thing is keeping a close eye for any problems. It also is a nice way to start the day and end the day. Now 10 minutes doesn't seem like a lot of time but it is more than enough to keep any weeds under control and check for any problems. Sometimes I'm in the garden several times a day. I always pinch, weed, deadhead, and observe because I know it saves me a lot of time and energy later.
Happy Gardening
Garden Gnome


 Working Copy
 Herb Bed Plan
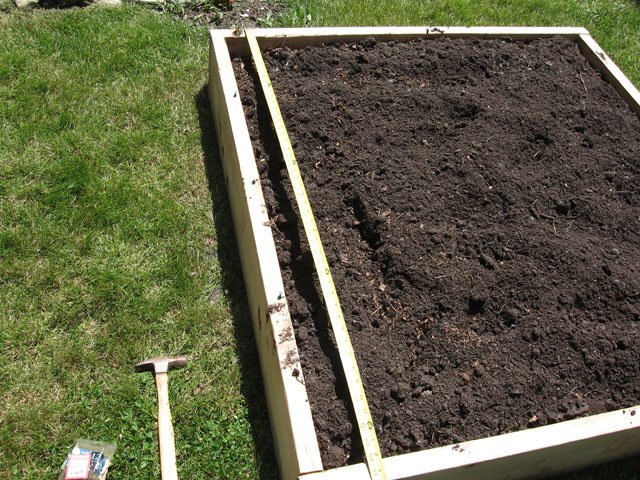 Bed constructed and filled
 Measuring Up
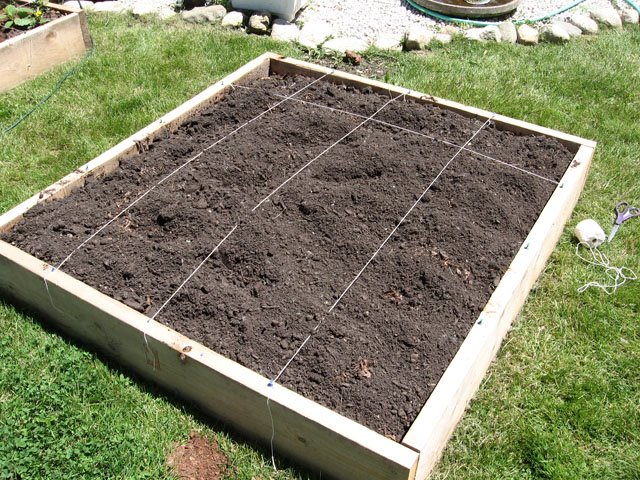 Cotton Yarn
 Bed Ready to Plant
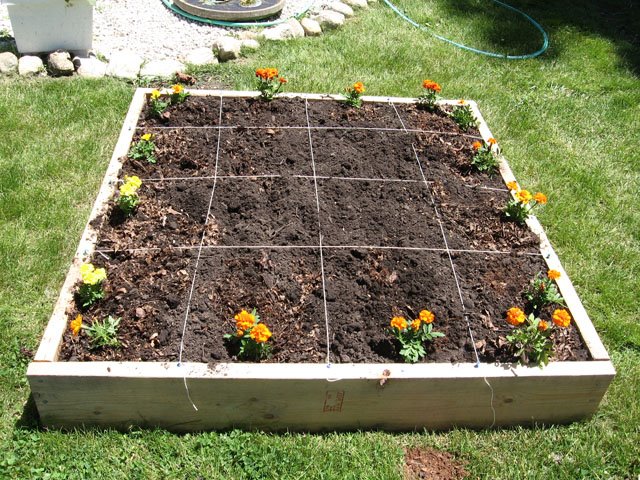 Marigold Border
 Rabbit
 Plastic Owl
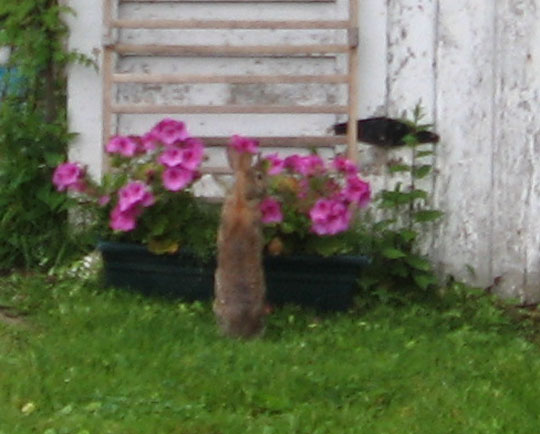 Rabbit in Windowbox
 Robbin's egg
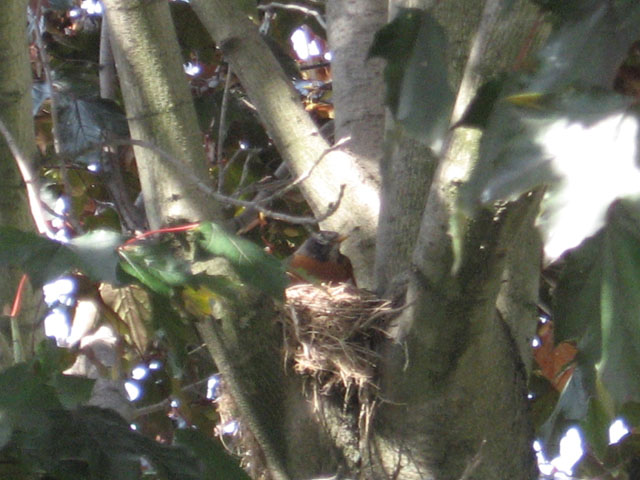 Robbin on Nest
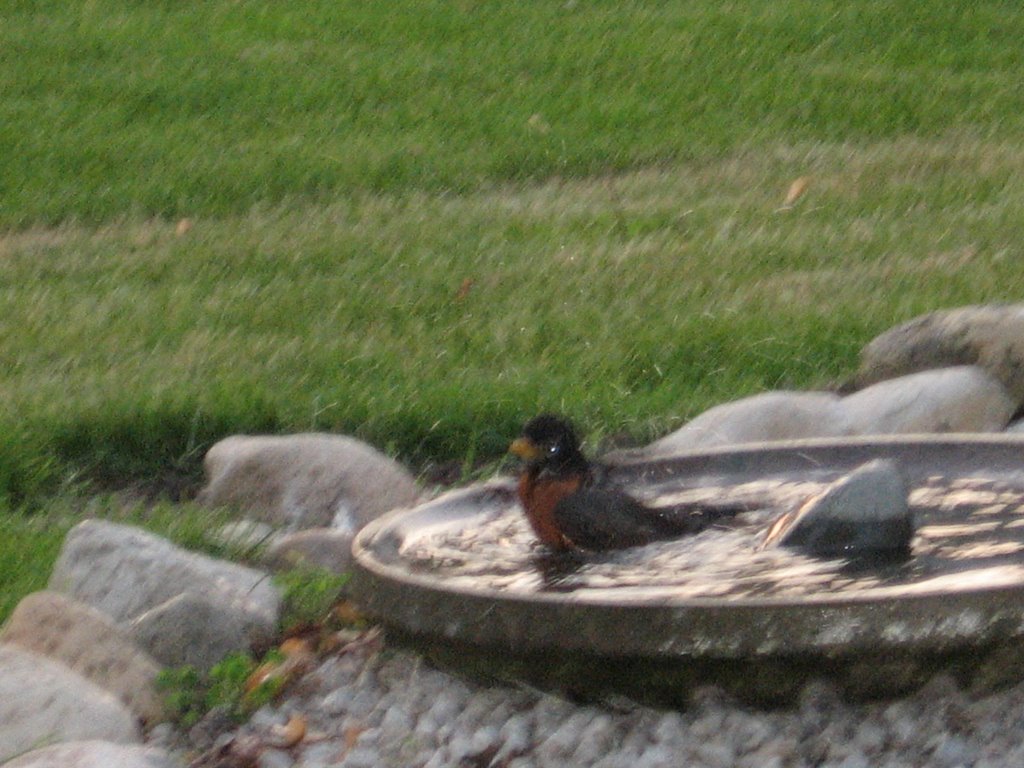 Robbin in Birdbath
 Swallow


