Neighbours talking over the garden gate has long been a tradition. They share gardening tips, complain about the weather and pests yet are ever eager to discuss their gardens. That is what I had in mind when creating this blog. So stop by my garden gate to find out the latest happenings in my garden.
Happy Gardening!
Garden Gnome
"All my life through, the new sights of Nature made me rejoice like a child." ~ Madame Marie Curie"
Baby Sparrow
July 19, 2009
We continue to see below average temperatures with above average rainfall. On rainy days garden planning continues indoors where I'm working on the final design for the vegetable garden. I've been doing a bit of research on fruit trees, grapes and chickens all of which we hope to have incorporated into the garden by next spring. Over the next few months there will be a lot of changes in that zone.
Outside we continue to enjoy a wide variety of garden visitors including this baby sparrow that still can't fly too well. If we ever get a couple of days of warm, sunny weather I should have a lot of tomatoes. Still given the rain, I don't mind waiting as long as the tomatoes don't split. The salad greens are doing remarkably well. The peas are up as well. The herbs are also growing nicely. All in all despite a late start I am quite pleased with the progress in the two raised garden beds.
Happy Gardening!
Garden Gnome
©2006-2009
Every gardener has small garden tools but when it comes to small garden spaces and square foot gardening you really need handheld gardening tools. They outperform the forks and dessert spoons I've been known to use on occasion. Besides they make you feel more like the gardener you know you are!
 Trowel & Cultivator
I actually have 3 hand held trowels with the most recently purchased one due to not being able to find the other 2 after our move. I also have a new cultivator for the same reason. My new ones are hanging safely on a hook in the garage where they will be joined by my old ones as soon as I find them.
Handheld garden tools usually cost under $10 each but recently the dollar stores are carrying them for considerably lower prices. I picked up this handheld trowel and cultivator at Dollarama for $1.25 CDN each. Surprisingly they are quite heavy and if looked after properly will continue to give durable service in the garden.
The enemy of most garden tools is rust. If you want to get the most out of your garden tools then rust prevention is a must! After each use I rinse off the handheld tool then hang in the sun to dry completely. Some gardeners recommend using an oil on garden tools but this is not something I recommend. Simply keeping these tools clean and dry is enough to retard rust for quite some time. Scratches from use will eventually wear down the painted finish leaving unprotected metal. When this gets bad enough to cause rusting I take fine steel wool to clean up the tool well then apply a new spray paint finish.
 Sprinkler Head
The vast majority of manual watering I do in the raised garden beds involves using a sprayer attachment on the hose. We are very lucky that even this is seldom needed. When we get the rain barrels set up I will return to using a drip watering system. Containers have already been set up to use collected rain water. I like to water close to the roots to avoid getting the foliage wet. Wet foliage is one of the quickest ways to spread diseases amongst plants in your garden!
On the very rare occasion that we need to use a sprinkler attachment to totally soak through the beds I use the one pictured. A sprinkler comes in handy after a dry, hot spell because it not only waters the beds deeply it cleans dust and dirt from the foliage much the same as a good rainfall does. The best time to use a sprinkler is just after any dew has burned off and well before the sun hits the plants. Water droplets left on the plants act as magnifiers for the sun so can cause sun damage in susceptible plants.
My sprinkler gets used about twice a season depending on the season. This year unless August changes dramatically from July it will see no use. At any rate, my sprinkler was showing signs of rust. I decided it was time to clean the sprinkler up to keep it in good condition for later use. I used stainless steel to remove the rust then washed the sprinkler well and set in the sun to dry well. Once the sprinkler was dried I plugged the input and output holes then set the sprinkler on an plastic food container then on a sheet of cardboard. I sprayed the sprinkler with 2 coats of Kylon® spray paint. When the top was entirely dry I turned the sprinkler over and repeated with the bottom. When the sprinkler was completely dried I replaced the washer and it was ready for use. This simple bit of maintenance will give me several more years of life for the sprinkler.
Happy Gardening!
Garden Gnome
©2006-2009

Things are progressing nicely in the garden despite the below average temperatures. We've had a lot of rain and a couple of sporadic days of warmer weather which has helped. The tomatoes that were first planted are now setting fruit and are over the tops of their cages. Everything is looking quite healthy except for the Kentucky Wonder pole beans and brussel sprouts! Something has decided the beans are good munching but I haven't seen what yet. The brussel sprouts were almost destroyed by slugs but I took care of that problem by removing the slugs and putting the pots where slugs can't get them. Once in the ground I will protect them with a bit of copper wiring. I planted three more Sweet 100's as well. So all in all things in the garden are progressing nicely.
 Salad Greens
Just look at my beautiful salad greens! In the top left corner there is Chinese mustard. This is a wonderful green that adds a peppery zip to sandwiches and salads. The lightest green square is Grand Rapids leaf lettuce. This is one of my favourite leaf lettuces for growing. It is relatively problem free and like most lettuces likes cooler weather. The two bottom squares filling most of the bottom of the picture are mesclun mix. Mesclun mix is mixture of spring leaves like Chinese mustard, curly endive, dandelion, red chicory, romaine lettuce, arugula, cresses and red oak leaf lettuce but others may be included. You can buy a package of Mesclun mix with the mixture varying from one grower to the next or you can create your own seed mix to suit your palate. It usually is is balance between sweet and bitter greens. If you find you really enjoy one particular element of the mixture, let it go to seed and collect the seeds for the following year's garden. That is what I did for the Chinese mustard.
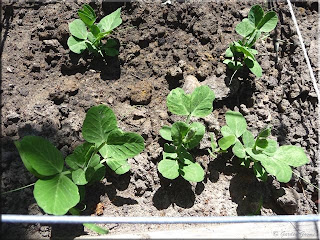 Little Marvel Peas
My peas were planted late this year. By rights they should have been planted four weeks before the average day of last frost (ADLF) however peas can be sowed up to the hot summer days to give a continuous supply of peas during the summer months. Once the days begin to cool start sowing again for your fall garden.
Little Marvel peas are one of my favourite cultivars because they are a heritage cultivar. The deep green pods are almost round tightly packed with 7 to 8 nice sized, sweet and tender peas. They are good performers in my zone (Canada 6A). I did experience a bit of powdery mildew in my former garden but I really do think that was more of a location issue with a bit too much shade. This garden is in a better location with a lot less shade so hopefully there won't be any problems!
Happy Gardening!
Garden Gnome
©2006-2009
 Earthworm
July 13, 2009
Worms whether it be earthworms or red wigglers are an excellent indicator of your soil condition. Ideally you will have both since earthworms burrow deeper turning and feeding the soil at the same time. If you are gardening in raised beds or tradition beds and don't see any worms when you are working the soil, you have a problem! If your soil cannot support a healthy population of worms then it certainly cannot grow vegetables. That is because there is an absence of organic matter in the soil, absence of moisture or it is sandy or too acidic. Worms do not like sandy or acidic soil and they consume the organic matter and in return leave rich worm castings. So not only are they helping to break down organic matter they also give back nutrients to the soil. At the same time they continuously aerate the soil helping to keep the light.
Our two new beds were set on the existing cleared ground then filled with a top soil mixture. I am pleased to say that very little soil disturbance reveals red wigglers! Had I not seen these worms within a week of putting in the beds I would have added a bit more organic matter and a tub of red wigglers to each bed. Red wigglers and earthworms can be found at any bait shop or ordered online.
There are many ways to increase organic matter in your soil which will keep your worms happy which in turn will keep your soil in tip top shape for your vegetables. The obvious solution is adding compost from your compost bin. You can also add well rotted manure and well rotted leaves. Some home gardeners using the square foot gardening method use one or two of the squares to put small amounts of pureed kitchen scraps then cover with a light topping of soil. The worms will eat through this within a week much the same as vermicomposting. Another easy way to add a bit of compostable material is when you weed. Young, tender weeds that have not gone to seed can simply be tilled under the soil where the worms will take care of them for you. Apply regular dressings of organic matter to your garden to keep your worms happy. Do not work in any clippings from vegetable plants that appear to have signs of disease such as blight or powdery mildew. Do not work in any weeds that have gone to seed. It is always better to remove the majority of gardening debris to be composted if possible or destroyed if necessary. This practice keeps diseases from spreading in the garden or remaining in the soil.
Worms are one of the most beneficial critters you can invite into your garden. They eat harmful bacteria, nematodes and fungi while producing a top grade fertilizer. They produce nitrogen, phosphorous, potassium, calcium carbonate and other micro nutrients in forms the plants can easily use. Their castings also help reduce the acidity of the soil over times because the castings contain calcium carbonate. A healthy worm population will not only help with your soil conditions they will encourage beneficial birds to frequent your garden helping with pest control. For the fishermen amongst the gardeners, a healthy worm population provides excellent bait as well.
Happy Gardening!
Garden Gnome
©2006-2009
Last weekend was an extremely busy one following a rather cool, rainy week. This gave me little chance to get out into the garden. It's never a good idea to work in the garden when the foliage is wet as this will cause any existing plant disease to spread rapidly. Yet checking the gardens daily is important to catch any potential problems before they become problems. Saturday morning I decided to spend a little quality time in the garden before we left for a family gathering.
 Lots of Weeds
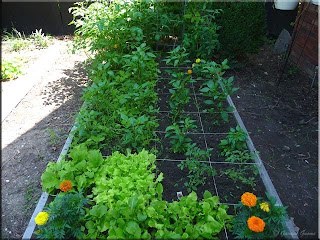
The few spells of warmer daytime temperatures combined with lots of water has been very good for the garden beds. Unfortunately these conditions have also been ideal for the weeds. As you can see it was getting to the point of being difficult to see the pepper plants!
Weeds in and of themselves are not always a bad thing. In fact you can use them to your advantage to help protect seedlings from certain pests until they become established then pull the weeds to allow the desired plants to continue growing. Other weeds such as pig weed and dandelions are edible plants so may even be desirable to leave a few in your garden. I decided to do a fairly good weeding to get the beds under control and keep weeds to a minimum. Notice the minimum as I am not a fanatic at keeping a completely weed free garden. A few weeds will continue to offer a bit of insect protection but too many weeds will take up too many nutrients so a bit of balance is good.
 Partly Weeded
Weeding raised beds planted in the square foot gardening method is rather easy. I sit on a small stool then using my handheld cultivator I break the soil then move the cultivator back and forth in a zig zag manner. This loosens the soil while doing the weeding. Then I simply pick up the weeds roots and all and put them in my weed bucket. It is simple yet effective. I weeded 24 of the 40 squares of the first garden in about 20 minutes using this method combined with some basic pulling through the lettuces.
One thing that I find rather interesting is the squares with marigolds in them had very little in the way of weeds. The herb garden looked almost bare in the unplanted squares in comparison to the tomato, pepper and lettuces bed. I finished up the weeding of this bed and the herb bed Sunday morning spending a half hour before leaving for an afternoon of boating. Now the beds have been fully weeded, keeping the weeds in check is as easy a pulling any as they appear. I usually pull a few weeds each day when I check the beds so a longer weeding session is seldom needed.
Happy Gardening!
Garden Gnome
©2006-2009
A garden is more than just a few plants tucked into the ground. It really does become an outdoor living area. Yes it provides food but that is no reason it can't aesthetically be pleasing! Even functional gardening necessities can provide a bit of eye candy. We wanted to tuck the first raised bed perpendicular to the garage. The problem was there was a large, scraggly and over grown euonymous bush blocking the way. We made the executive decision to remove it freeing up the space for the first path and removing yet one more rodent habitat. What we discovered was a rather unique and obviously homemade water hose hanger!
 Before
Thank goodness there is already water, natural gas and electricity to the garage so we don't have to worry about installing any of those lines. The existing water spigot is what I would say is in need of a bit of tweaking but that really is a minor and inexpensive repair. The water hose hanger sits in front of the garage within about 9" of the water tap. It is iron like many of the other handmade artifacts we've found on the property. I immediately decided to keep the hanger. It has nice lines and just suits the garden nicely. The problem was it had been covered by the bush so obviously neglected for quite some time. Pictured is the unexpected find along with two of my new solar lights. As you can see there is still much work to do for this first pathway but that will come.
 After
After
The hose hanger obviously needed work but it was still firmly planted in the ground and very functional. I swept off the cobwebs then went over the entire structure with a brass brush to remove both rust and any loose paint. Then I washed off any dust with the hose and let the hanger dry completely before proceeding.
The hanger is only inches from the garage so I protected the area behind the hanger with cardboad. Then I sprayed 2 coats of Weathershield® Rust Coat in a gloss black. Using a gloss paint is something I like doing for certain outdoor projects. In this case the surface was quite textured so the gloss accented it slightly resulting in a soft sheen. At the same time the gloss tends to weather nicely. I'm quite pleased with the results. It will look a lot different with the hose hanging on it which is the next step.
Happy Gardening!
Garden Gnome
©2006-2009


 Trowel & Cultivator
 Sprinkler Head
 Salad Greens
 Little Marvel Peas
 Lots of Weeds
 Partly Weeded
 Sweet Million Tomatoes
 Upside Down Tomato Planter
 Tomato Sucker
 Before
 After
After


