Today is the last day of February, in a leap year no less. I can't believe the first two months of 2012 have flown by so fast! We normally have the furnace on late October to mid-April but this past winter has been extremely mild to a fault. Just last week a couple of farmers were talking in the local ER waiting room about the lack of cold weather, specifically a hard freeze. One said that the upcoming growing season would be adversely affected and he is quite correct. Winter wheat in particular will be affected by the lack of a hard freeze.
Our hard freeze usually happens in January followed by another cold snap in February and while we still may get a cold snap in March, it's doubtful this year. Unfortunately, lack of a hard freeze has had more than agricultural affects in our area with a lot of illness especially norovirus. We've had plenty of precipitation but little to no ice in the local waterways and standing water in the fields. The days are getting longer and the temperatures will soon be rising giving the mosquitos a head start on their season. On the plus side, home gardeners will be able to get their gardens in a bit earlier than the Victoria Day weekend, celebrated this year May 19 to 21. I'd say the ground will be workable by a good two weeks earlier meaning we will have an extended growing season this year. Predictions are for a hot, dry summer though so that will affect many home gardeners. Time will tell but at any rate I am in high gear starting seeds.
Happy Gardening!
Garden Gnome
©2006-2012
Happy Gardening!
Garden Gnome
Wednesday, February 29, 2012
The Home Gardening Season is Fast Approaching
Sunday, February 26, 2012
Pothos (Epipremnum)
Pothos (Epipremnum) is a beautiful, low maintenance house plant that with white or yellow variegated leaves, or the leaves can be solid green. It is commonly called devil's ivy or variegated philodendron. My pothos is about 10 years old. It grew nicely until we moved to our last house where no plants wanted to grow indoors. I struggled for 4 years to keep him alive and I do mean struggle. When we moved here, the pothos started to perk up much to my delight.
The depth of the green has been very much enhanced. Although there are signs that more recovery is needed, it is obvious that my pothos loves his new planter and location. Each day there are more signs of improvement so I am quite happy!
When I was repotting the pothos a piece accidently snapped off. I immediately popped the piece into a jar of water for rooting. Pothos propagates nicely using the water method or you can stick the cutting into a pot of vermiculite. If you use the vermiculite method, use a bit of StimRoot® #1 for softwood cuttings. This is a hormone that stimulates root production. Either way, the cutting will develop roots. Once the roots are about 2 - inches long, the cutting can be potted in soil.
When my pothos is back to full health, I will start making a few more clippings. This will give me a few more plants while encouraging new growth on the parent pothos. In the meantime it is a bit of TLC for the pothos.
Happy Gardening!
Garden Gnome
©2006-2012
Saturday, February 25, 2012
Two New Gardening Finds
This is a wonderful time of the year when a wide range of new gardening finds make their way onto the store shelves. I have been buying seeds since they first appeared on the shelves a couple of weeks ago.
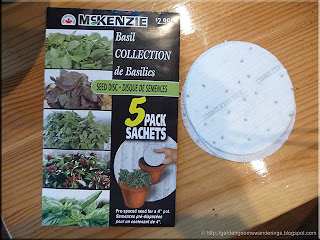
McKenzie Seeds located in Brandon, Manitoba is Canada's leading seed packet company. This is the first time I've seen their collections line of pre-spaced seed on discs for a 4 - inch pot. I bought the basil collection consisting of sweet basil, purple basil, lemon basil, thai basil and sweet basil. Each disc is pre-seeded ready to use. Simply fill the pot with seed starting mix then put the disc on top and water. The disc is a fiber material that will help keep the seeds moist for germination. The discs are available in pepper, tomato and herb collections as well. I paid $2.99 which is a bit higher for seeds but potted 4 - inch plants usually go for that price each and I will end up with five potted plants from the package.
The dollar store can be a mecca for gardening supplies, some of them made in Canada but others manufactured elsewhere. I spotted these individual mini greenhouse pots. They were 3/$2 so I bought six. The mini greenhouse pots consist of a 5 - inch pot with a vented, removable clear plastic dome lid. The height when assembled is nine inches so will accommodate a seedling up to about 4 - inches tall. What I really like is the venting system so the dome can be completely closed, partially open or fully open.
I planted the basil collection in the mini greenhouse pots. Lavender was planted in the last one. The seed discs were very easy to use as were the mini greenhouse pots. I will be transplanting the plants when big enough into larger, self-watering pots for the patio. With proper care the mini greenhouse pots should give a few years of seed starting. I actually like these enough to buy a few more. As I type this, the seeds planted in the mini greenhouse pots have sprouted so I'll share their progress. I am rather pleased with both the discs and pots!
Happy Gardening!
Garden Gnome
©2006-2012
Sunday, February 19, 2012
Repotting Houseplants and Starting Seeds
It's that time of year! Spring is just around the corner and with our ADLF quickly approaching it is time to start seeds. I have been busy repotting all of my houseplants into self-watering pots. I really do like the pots! The larger self-watering pots for the floor plants are only $7.47 at Wal-Mart which is rather inexpensive compared to some of the regular pots that size (12 - inch). I used the smaller 7 - inch self-watering pots from the dollar store ($1.25 each) to repot all of my indoor herbs. My indoor herb collection is lower than I would like. I currently have two pots of parsley, oregano, lemon thyme, sage, sweet basil, 2 pots of rosemary, and mauve garlic chives.
I am rather pleased that all the geraniums I brought with us when we moved survived! One of the local schools sold geraniums last year for $3 each which is more expensive than the nursery or other stores but it was for a good cause. I bought ten to pop into window boxes without actually planting the boxes for instant splashes of colour while the house was on the market. I used the same size (12 - inch) self-watering pot to transplant three geraniums into each one for two matching planters for the front porch. That leaves me a total of eleven more geraniums to transplant.
I also used the same size self-watering pot to repot the Hibiscus that survived the move. Wal-mart had them on sale for $5. I bought two of them to pop as is into tub containers on each side of the front door when the house was on the market. Once the house sold, one went to my husband's office then made it's way to our new house. The other came directly to our new house where it sat on the deck. I brought it in as soon as the temperature started dropping as the Hibiscus only tolerates temperatures above 50ºF. The one that had been at the office was barely surviving so I wasn't surprised when it looked dead after a brief cold spell. It is still on the deck as I was curious whether it would come back in the spring.
Our ADLF is April 15 so this is the time to start some herbs, tomatoes, peppers and ornamentals. I did a bit of seed shopping. My goal this year is to grow as much as possible from seed rather than buy plants but I know I will still buy plants because I can't resist. I started purple basil, lemon basil, sweet basil, thai basil, cinnamon basil and lavender in individual greenhouse pots. These are rather neat so I will talk more about them tomorrow. I bought a 72 cell greenhouse starter kit that will be used for starting tomato, peppers and a few ornamentals. 'Tis a busy time but a rather pleasant way to spend a bit of time while visions of my new gardens dance through my head :)
Happy Gardening!
Garden Gnome
©2006-2012
Saturday, February 18, 2012
Talk to Your Plants
Years ago as a newlywed way back when terrariums were all in vogue there was a movement encouraging talking to your plants to stimulate healthy growth. Some likely thought that this idea was a sure sign of an unhinged gardener heading to the confines of a padded cell but you know talking to plants has a lot of merits. I talk to my plants even name some of them. The benefits of talking to plants is two fold.
First, talking to plants establishes a firm connection between home gardener and the plant. It is purely psychological for the home gardener but it can a huge physiological effect. In fact, in some psyc wards of hospitals plants are encouraged for their healing effects psychologically. Caring for a plant gives a patient a reason to live and much like some pets a plant is never judgmental, but totally reliant on the care it receives. With proper care and nourishment, a plant will flourish rewarding the care giver with beautiful lush growth. Living plants in any environment breath life into that room. They help to purify the air while bringing a smile.
Plants grown outside give the grower much needed exercise, exposure to the sun which translates into the natural production of Vitamin D, connect the grower with nature and help to lower blood pressure while reducing cholesterol levels. Even puttering in a garden if only a balcony garden for 15 minutes a day can reap huge rewards physically! Gardening is a great stress reducer that naturally helps your body relax. It is only natural at some point to start talking to plants when they have this much effect on your life.
Second, there is actually the science behind talking to plants. Humans breath in oxygen and produce carbon dioxide. Plants use carbon dioxide through photosynthesis to produce oxygen which really explains why humans and plants need each other. Talking to a plant gives that particular plant a little boost of carbon dioxide. Much like giving a plant extra nutrients via fertilizers, the carbon dioxide will help in the photosynthesis cycle which results in a healthier plant. And the plant doesn't even care if you have bad breath as long as you give it the carbon dioxide it wants.
So go ahead and talk to your plants. They will listen then reward you with beautiful, lush growth. Heck I even name some of my plants but that is another story...
Happy Gardening!
Garden Gnome
©2006-2012
Tuesday, February 14, 2012
Avoiding Plant Stress
Just as with humans, any factor whether external or internal that affects a plant is known as a stressor. The stressor can be beneficial or harmful or both. For example, rhinovirus causes the common cold in humans which can be harmful if a secondary infection sets in. At the same time the common cold helps to strengthen the immune system which is beneficial. The same is true in plants. However, when we talk of stress it is usually in a negative way, referring to any factor that is harmful.
How a plant responds to adverse stressors depends on the health and type of plant. The effects of plant stress range from minor to severe and may even result in the death of the plant. If corrected early enough the plant may recover fully or it may be weakened. A stressed plant is not a healthy plant making them more susceptible to disease and insect infestation. The following is a list of plant stressors with an explanation and tips to correct.
- sudden temperature change - Simply bringing a new houseplant from the store to the car then into the house on a cold winter day is enough to cause stress. Leaves may wither and die. If the plant is place in a warm, sunny location in the house then watered well new growth should appear but the old damaged growth will not recover. It should be carefully trimmed from the plant.
- extreme temperatures - Plants exposed to too hot or too cold of temperature even briefly are adversely affected and often will die. In general, keep houseplants within your normal household temperature comfort zone (68ºF to 72ºF). If frost is forecast, cover outdoor plants and bring potted plants indoors. Extreme summer heat is difficult to avoid for outdoor plants. You can use shade cloth to help cool as well as move potted plants into the shade. If there is a heat wave be sure to keep all outdoor plants well watered especially potted plants.
- incorrect watering - One of the most common mistakes home gardeners make is with respect to watering. They either over water or under water, both of which can kill the plant. Over watering can cause mold in the soil, mildew on the leaves and root rot. It makes a plant more susceptible to fugal diseases and will cause dampening off in seedlings. Over watering will cause nutrients to leach out of container planters including raised beds. Under watering will cause a plant to wither, drop leaves and kill the plant if not corrected immediately. Ideally, both indoors and outdoors keep the soil moist but not wet. When pinched the soil should just hold together. Some houseplants like African violets are susceptible to water damage on their leaves so should always be watered from the bottom. In general, it is better to water the soil not the leaves. Wet leaves spread plant diseases. Water droplets on the leaves serve as mini magnifying glasses causes burn marks on the leaves on sunny days. Don't water outdoor plants after dusk or during the heat of the day (1 PM to 4 PM). The exception to this is emergency water if a plant is obviously heat stressed. Move the plant to a shady location then water the soil well. Prevent watering problems in container plants by using self-watering pots. Use a soaker hose for garden beds outdoors. Mulch is your best friend in helping to conserve water in your garden beds while preventing them from drying out. Choose a mulch that will naturally repel problematic insects (eg. red cedar) and avoid those that will create other garden problems.
- fertilizing - Incorrect fertilizing or too much fertilizer will cause fertilizer burn. The plant may not survive. Do not fertilize container plants potted in soil containing slow release fertilizer. In general it is better to fertilize every 2 to 4 weeks if using granular fertilizer. A small amount of liquid fertilizer can be added to the reservoir of self-watering pot.
- chemical exposure - Chemical exposure can very much adversely affect plants indoors and outdoors. Exposure can be accidental or on purpose. Outdoors most chemical exposure aside of herbicides is accidental, often caused by over spray drifting from one property to another. If your neighbours are spraying for weed control it may affect your garden beds. The problem is unless you know they are going to spray, it is difficult to protect your plants. If you know, they are going to spray simply protect via sheeting, gardener's cloth or even tarps while they are spraying. Once they are finished spraying remove the protective cover. Over spray can come from salt trucks in areas where snow removal is necessary and home owners can cause salt burn by using salt to melt ice on their property. In areas where homes back onto farm land as ours does, over spray can come from the farm land when herbicides and fertilizers are applied. Lessen this exposure by privacy fencing or plant a row of cedars along that property line. Nicotine is quite toxic to plants as well. I lost a rhubarb plant when a house guest emptied the ashtray beside it. Rhubarb is almost a weed that when established is quite hardy yet the nicotine killed it and nothing would grow in that spot either. Houseplants are exposed to chemicals via household cleaners. Years ago, I removed the wax from the kitchen floor using household ammonia. Not only did I damage my lungs, the green in most of my houseplants turned turquoise and most did not survive. I lost most of my window garden plants and several floor plants. That served as a very valuable lesson as to how dangerous household cleaners even those used for natural cleaning can be. Avoid all harsh household cleaners. Use baking soda, soap, vinegar, household ammonia (sparingly and with window open) and rubbing alcohol for household cleaning.
Happy Gardening!
Garden Gnome
©2006-2012
Monday, February 13, 2012
Using Fertilizers
Yesterday I discussed what fertilizers are and understanding the numbers on the label. If you recall, fertilizers are either organic or inorganic and are labeled with the N-P-K content but some may also include the S content in the form of N-P-K-S. It is important to choose a fertilizer based on the plant's needs. If you want a nice, bushy plant with lush greenery, choose a fertilizer high in nitrogen (N) content. If you want a plant with good fruit development and a strong root system, choose a fertilizer high in phosphorous (P). If you want a plant with beautiful, showy flowers, choose a fertilizer high in potassium (K). Don't forget the importance of the other three macronutrients (calcium, magnesium and sulfur) or the micronutrients boron, chlorine, copper, iron, manganese, molybdenum and zinc.
Fertilizers are available in liquid and granular forms. You can also buy pressed fertilizer spikes that are pressed or pounded into the soil. Liquid fertilizers feed the plants upon application so need to be reapplied at regular intervals. Pressed fertilizer spikes and granular fertilizers are slow release fertilizers. Once applied they will feed the plant then slowly release fertilizer for a couple of months continuously feeding the plant each time it is watered. There are benefits to using either. Soil amendments like compost will also continuously feed the plant as they continue to break down. If you are busy or are away from home for extended periods, the slow release fertilizers will keep your plants healthy without the extra attention. If you use self-watering planters, liquid fertilizers will achieve the same goal when added to the reservoir water making your container plants very low maintenance.
The use of inorganic fertilizers can cause the depletion of micronutrients (trace minerals) in the soil. This is more of a concern for those growing in traditional garden beds. Some soil amendments (eg. mulch, compost, leaves) are great inexpensive fertilizers. Fish or manure tea is a wonderful, inexpensive organic fertilizer for container plants. Other soil amendments (eg. manure, straw) are also good but can cause problems. For example, manure can cause fertilizer burn if applied heavily and straw will introduce more weed seeds than any home gardener wants to deal with. Fertilizer burn also occurs due to over fertilizing. Leaves will brown and in some cases the plant will die.
I personally prefer to use organic fertilizers on all edible plants. I do use inorganic fertilizers on ornamental plants and houseplants grown in containers but use organic fertilizer for any ornamental grown in actual garden beds. I use organic oil amendments like compost in my container plants both indoors and outdoors. When I plant tomatoes and peppers I always add epsom salts (magnesium sulfate) to the hole then monthly thereafter and I use epsom salts for my plants in containers. I also use organic or inorganic fertilizers for all plants I grown hydroponically including clippings being rooted in water (eg. impatiens, tomatoes, pothos, ivy) with organic fertilizer used for all edible plants.
Fertilizer should be applied every two to four weeks, bi-weekly for container plants including raised beds and weekly if growing hydroponically. You can fertilize every time you water especially for container plants. In this case, you use a very dilute fertilizer solution. You can also use soil amendments that will continuously feed your container plants. Do not fertilize if using a potting mixture with a time released fertilizer or on a newly purchased plant with a time released fertilizer in the soil. A slow release fertilizer can be recognized by the appearance of small round balls that will be green, white or brown. If a plant is diseased or is infested, treat first then fertilize lightly. Fertilizing will help the plant recover. If you are using self-watering planters, add a dilute fertilizer solution to the reservoir
Never fertilize a plant in dry soil! The thirsty plant will take up too much fertilizer when watered causing damage to the roots and fertilizer burn. When applying any fertilizer with the exception of mulches, compost and leaves always water first then apply the fertilizer to prevent fertilizer burn. Don't over fertilize but in the event if you accidently over fertilize a plant in a container, flush with clear water to help remove the excess fertilizer. This will minimize the damage but you can still expect a bit of damage to the plant.
Happy Gardening!
Garden Gnome
©2006-2012
Sunday, February 12, 2012
Understanding Fertilizer
Home gardeners at some point will turn to using a fertilizer. If growing in containers indoors or outdoors, the use of a fertilizer is a must. The reason being, the nutrients in the soil in the container become depleted by the growing plant so they must be replaced. There are two main categories of fertilizers: organic and inorganic. Many home gardeners concerned only with the vegetable/fruit yield or those growing ornamentals turn to inorganic fertilizers. Those concerned about growing organic, pesticide free vegetables and fruits use only organic fertilizers on edible plants but may or may not use inorganic fertilizers on ornamental plants. If they use inorganic fertilizers they are careful to not use them where any run-off could contaminate their organically grown fruits and vegetables.
Fertilizers are normally labeled organic if they are organic but inorganic fertilizers don't have any indication that they are inorganic. There are three numbers on the label in the form of, for example 8-7-6. This indicates the nitrogen (N)-phosphorus (P)-potassium (K) contents so using the example that fertilizer has 8% N, 7% P and 6% K. Nitrogen is needed for the growth of leaves; phosphorus is for the growth of roots and fruit development; and potassium is for flower colour and size. While you could use a general, all-purpose fertilizer (eg. 10-10-10) it is better to tailor the N-P-K to meet the needs of the plant. If you are growing vegetables, a fertilizer higher in P is preferred for fruiting vegetables (eg. tomatoes, peppers) but a fertilizer higher in N is used for leafy vegetables (eg. lettuces, chards). If you are growing flowering ornamentals then use a fertilizer with a higher K content. In addition to N, P and K there are three additional macronutrients needed for healthy plant growth. They are calcium, magnesium and sulfur (S). These macronutrients are usually included in fertilizer compounds. Sometimes the S content is indicated by a fourth number on the label in the form of N-P-K-S. Fertilizers often contain micronutrients needed for healthy plant growth. These are boron, chlorine, copper, iron, manganese, molybdenum and zinc.
Happy Gardening!
Garden Gnome
©2006-2012
Saturday, February 11, 2012
Tips for Using Self-Watering Planters
Using self-watering planter for houseplants, on the patio or deck and in the garden makes a lot of sense. They result is healthier, stress-free plants that are better equipped in warding of disease and infestations. I have been busy repotting all of my houseplants and starting planted pots for outdoors using self-watering planters. Here's a few tips for using self-watering planters:
- size of self-watering planter - If repotting a plant, choose a size of self-watering planter about 1" to 2" diameter bigger than the pot the plant is currently in. For example if the plant is in a 4" pot, choose a 6" or 7" self-watering planter.
- soil - Use a good quality potting mix or mix your own using sterilized soil, vermiculite, and peat moss. The soil should be light and fluffy but with a bit of body to it.
- fertilizing - By the time most plants need repotting, they are a bit stressed. Use a fortified (.14-.14-.14) potting mix for non-edible plants or fertilize after repotting. Organic fer
- watering - Do not water or fill the reservoir before placing the plant where you want it! Place the potted plant on a plate, charger or floor protector. The reservoir can overflow if filled beyond it's capacity. Place the plant in a manner that there is easy access to the reservoir fill hole. Water the plant from the top until the entire soil surface is wet. Let the plant sit for 15 minutes before filling the reservoir. This allows any excess water to go into the reservoir and helps to prevent overflowing. Use a small curve spout watering can to fill the reservoir. If the reservoir has a float system, stop filling when the float pops up. If the reservoir does not have a float system, use your finger as a guide to fill until the reservoir hits your finger just slightly below the opening.
Happy Gardening!
Garden Gnome
©2006-2012
Friday, February 10, 2012
Why Use Self-Watering Planters?
There is a wide range of self-watering planters available or you can make your own. Basically a self-watering planter consists of two chambers. The upper chamber is the potting chamber. There is a series of slits in the bottom of the upper chamber allowing water to be drawn from the lower chamber (water reservoir) by the plant roots using capillary action. There is some type of hole at the top of the lower chamber where you can add more water as needed. Inexpensive versions consist of the two chambers but more expensive versions have a water float in the reservoir and some type of wick on the bottom or even going up the side of the upper chamber.
It is also quite possible to make your own self-watering planters. There are many, many designs and instructions available online to suit every need. When it comes to houseplants and smaller patio plants, the purchased self-watering planters are likely less expensive than homemade but larger containers (eg. plastic totes) used to grow vegetables on the patio are less expensive if you make them yourself. The question is, why should you use self-watering planters? Here are a few of my reasons:
- healthier plants - Self-watering planters eliminate over watering and drying out. The moisture is consistently provided as the plant needs it so plant stress is greatly reduced.
- fewer infestations and diseases - Healthier plants ultimately means fewer infestations (eg. aphids, white flies) and diseases (eg. fungus, dampening off, leaf mold). While this is less of a concern indoors, it can be a problem for any container plant grown in the garden, on decks or patios. A healthy plant can tolerate an infestation better than a stressed plant.
- reduced time watering - If you have houseplants in every room of your house as you should as well as container plants outdoors you can easily spend an hour or so water plants each week. Each self-watering planter reservoir holds enough water to water the plant for 2 to 4 weeks. Instead of watering houseplants every other day or every week, the timing is cut in half to a quarter by using a self-watering planter.
- plant friendly - The reality is most home gardeners water according to their schedule not on the plant's schedule. A self-watering planter keeps the soil moist as needed but doesn't over or under water.
- easy fertilizing - All container plants require fertilization on a regular basis because they deplete the soil nutrients quickly. Simply use an organic liquid fertilizer added to the water in the reservoir. The plant will use it as the nutrients are needed without the fear of fertilizer burn.
- worry free - One of the biggest concerns anyone who grows plants in containers, indoors or outdoor is what to do when you go on away for an extended period of time. I know I have called family on more than one occasion when we decided to stay away longer than expected asking them to check my container plants because I couldn't remember if I had watered them before we left. I have an excellent network of family and friends to come to my rescue but not everyone has this. The self-watering planters remove this worry. As long as you keep water in the reservoir you know your container plants will be fine for 2 to 4 weeks. This will be a huge relief for those growing on patios too as patio plants can dry out quickly on a hot day.
Garden Gnome
©2006-2012
Thursday, February 09, 2012
Arboricola Bush in EEZY-GRO Self-Watering Planter
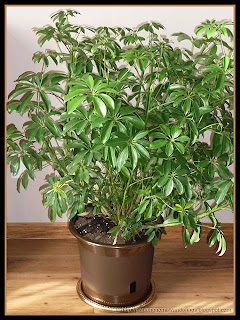
One of our local grocery stores was selling gorgeous floor plants in 10" pots for $9.99 so I bought a few. Plants breath life into a room but at the same time help clean the air so they should be included in every room of the house. Floor plants are wonderful for adding that extra touch without spending a lot of money. Pictured is the Arboricola bush I bought then repotted in and EEZY-GRO self-watering planter.
We are away from home for extended periods of time when we are at our vacation home. Our last house was in a rural location with no access other than secondary roads that are not plowed out as fast as the main roads. Rather than ask family and friends to come out to water my houseplants I turned to using automatic watering globes. The local dollar store sells the smaller ones 2/$1.25 and the larger ones at $2 each. I've been using them over a year now as an inexpensive yet effective alternative for keeping houseplants watered. There are three downsides to the watering globes. First they are made of glass so breakage is always a concern. The second downside is potential overheating if used outdoors and the final downside is at best a filled water globe will provide water between 5 and 8 days, or at least that has been my experience. I am moving towards self-watering planters for all of my houseplants and will be using them for various container plants in the garden and on the decks.
I was at Wal-Mart a couple of weeks ago checking out their houseplant selection. I decided to try an EEZY-GRO self-watering planter. These planters are made by Apollo Plastics Ltd.in Mississauga, Ontario. There is a water reservoir on the base of the planter and a wick on the bottom of the planter. Once the plant is potted, you water the top as you would normally. Then you fill the water reservoir through the opening. There is a small float device just inside the opening. The plant roots draw water up through the roots using capillary action as needed. The planter is designed in such a manner that the roots are not constantly standing in water making this an ideal planter for patio plants. This planter is designed to water the plant for 2 to 4 weeks depending on the conditions.
The EEZY-GRO self-watering planters are available in limited range of colours but should meet most gardening needs. There are versions available for hanging plants as well. I paid $7.49 for the 14 - inch diameter pots and $6.49 for the 7 - inch diameter pot. In perspective, if these pots keep my houseplants happy and healthy while reducing the number of times I have to water as well as eliminate the danger of potted plants drying out, it will be money well spent!
Happy Gardening!
Garden Gnome
©2006-2012